Wednesday 29 April 2009

Hot Desk

In this world of The Apprentice, dog eat dog 'colleagues', executive careers coaching to maximise your potential, power lunches (weren't they in the 80's!??) and generally having to deal with non sailing middle management types that would probably struggle to successfully run a bath if they tried living in the real world, - a world they harp on about but don't actually appear to have ever visited... You know the type - the young thrusters that come looking for you to sign off a deal at 17:05 specifically because they know you have a train to catch just so they can mention it casually to the section head that you must have finished early and get him to sign it instead.

Well this is what you need. A new desk. A bloody big one that says 'I'm an individual' and 'Keep Out Of My Way' in equal measure.... a bespoke, state of the art, all carbon missile of a desk that will stamp it's authority on your more errant staff - even when you errr - have actually gone home early!

What d'you think - Smart or what!!

Friday 24 April 2009

Fail to Prepare and Prepare to Fail (or F2P=P2F)

Vacuum bagging is not a black art, it is the application of physics to achieve extraordinary results which appear completely impossible to the layman - or a black art for short! (just kidding!) You can do some fabulous ambient cure stuff - where the weight of the fabric and resin holds itself down onto the work, but you would struggle to do some of the higher stressed work on a project like this without a vacuum pump and the right sort of consumables - so here's how to give you the idea.

We are going to lay up a couple of layers of reinforcement onto a foam core which will eventually be the replacement piece of deck to make the boat whole again. As the deck was in no fit state to use as a mould, we're using a piece of regular hardboard to cover it and effectively provide the shape. Most importantly to get a good result, do all the leg work first - prepare properly before you mix the resin and you are half way there... remember! F2P = P2F!

1. The hardboard surface is effectively our mould surface, so before applying resin, fabric or anything, ensure the parimeter is clean and airtight (ie is not onto a porous surface) then apply the vacuum tape to make the outer edge of the vacuum bag - so think carefully -it needs to be a good few inches outside of where the repair patch will end - and indeed you need an area within the vac tape to attach the vac pipe - so give some space for that (about a 2" x 2" space clear of the repair and on relatively flat surface). DO NOT REMOVE THE BACKING TAPE OFF OF THE VAC TAPE!!

2. First, cut the reinforcement materials DRY - in this case the top layers of the foam sandwich (we've already built the lower surface and stuck the foam core down) a layer of 86g glass (for toughness) and a layer of 200g carbon for stiffness.

3. Still not ready for that resin - now we cut the consumables : Peel Ply to cover the whole area, then porous (perforated) release film - often known as 'bread-wrap' - this will protect the next layer (the breather fabric) from the excess resin drained off of the laminate. Next comes the breather fabric, then finally the tough, vacuum bag film which will go over the whole job by about 6 inches in every direction (for a virtually flat panel that is - if the repair is 3D, then a much larger vac bag is needed).

Here's the whole stack. Working from the foam upwards - Reinforcements: 86g E-glass Woven, 200g Carbon Woven. Consumables: Peel Ply, Porous Release Film, Breather Fabric, Vacuum Bag Film. If you want to get hold of handy amounts of vac bagging materials have a look here!

4. To start the lay-up, remove the consumables and the reinforcement materials so you can apply resin to one side of the top of the foam, roll out the reinforcements onto the wet resin to stop them distorting. Wet them out with more resin and a brush or roller.

5. With the reinforcements all down and wetted through, lay on the consumables over the wetted out surface in sequence. The peel ply goes first - which will need some straightening and will start to soak up resin almost straight away - best to pull it around with a flat gloved hand on the surface instead of lifting it and reapplying (which can be a nightmare!)

6. This is followed by the porous release, the breather fabric - the breach unit if you are using one, and finally the vacuum bag - which is best initially at least just left to drape over the whole lot.
7. Closing the bag - Working along the edges , remove the tape protector from the vacuum tape and allow the bag film to fall naturally onto it. Then work your way around sealing the bag down with the tape. Pay particular attention to corners, pleats and 'tubes' caused by the bag film overlapping itself. It must be 100% airtight - not just look like it might be and the pump is a very big test.

8. Flash up your pump and connect. It should take just a few seconds to pull the bag down - more than 10 or 15 and you have a BIG leak. With the bag down, look around the edge for smaller leaks - usually audible as a hissing sound. Old wives tales talk of allowing a small leak to prevent all the resin being sucked out of the repair - but then old wives aren't necessarily the best composite engineers! A 100% leak free bag is what you really want and we spend as long as is needed to get one. Trimming the bag tight to the vac tape is good practise to help find leaks...


And voila! A good solid vacuum bag holding our composites down and squishing the resin throughout the job, and blotting out the excess via the peel ply and porous release (look carefully in the pics taken 5 minutes after the pump was started and you can see resin dots on the breather - a very good sign!) You could get a result by loading up the surface with weights - sand bags or similar - but 1 bar of net pressure due to a vacuum bag, even with a few % loss due to small leaks or pump inefficiency is going to produce around 13.5psi - which is a steady 840Kg per Square Foot! - Which would mean an area of deck like this, which was 5ft x 3ft (1500 x 1000) would need 12.6 metric tonnes on it to generate the same pressure! QED.

Take me back to carbonology!


Wednesday 22 April 2009

Born in a Storm

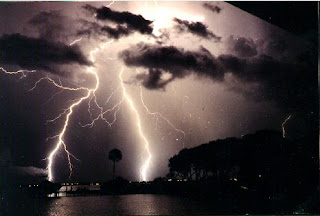
Maybe it's just geography - after all, we are in a large flat area of the UK that get's a lot of sunshine and very little rain fall, and in the Spring and Autumn gets some proper electrical storms - but sometimes workshop legends become true.
When we first set about rebuilding my old Firefly, (F888 Desperado) in 2001/2- arguably the first big rebuild we ever did, the workshop I used at the time - just 8 miles from London Stanstead Airport, was right in the warpath of some of the biggest storms I can remember. Work on the boat was often hampered by the works flooding - and in one particular storm , lightning hit the local power sub station and knocked out the whole industrial estate instantly - fine except it was 1am and me and the boat were pitched into total darkness! Jokingly I told my friends Desperado had been born in a storm...

The next boat we stripped and rebuilt was in 2005 - a 14 footer (GBR 1434) - Black Dog II. This was a special boat - my first proper skiff, and although she was 5 years old when we got her, she was the first of the Morrison 10's built - and all carbon throughout. Brilliantly built by RMW in the prime of their time - although that didn't stop me ripping up the deck and moving the centreboard (to very good effect I might add) A weapon and a half that boat... (it smashed my teeth in teaching me to bear away when you are fully pressed) Halfway through the rebuild and while working a late one the rain started to fall on the roof so hard you couldn't hear yourself think. An electric storm to stand the hairs on the back of your neck ensued and I remember metal bin lids flying around outside like eery flying saucers against the rain in the sodium street lamps. Man that was a storm. Great boat too.

Next came the GT60/ B1c Cherub (Ronin - GBR 2698) which we took to the Hyeres ISAF trial.. blah blah...! We built the whole thing here in Woodbridge in 2007 (man was it really 2 years ago Princey!!) in just 5 weeks from making the plug to the test sail. About a week from painting and we were using a laser to true up the centreboard case and mast foot. It had been a hot spring day and a light rain was just starting when I stopped for a cuppa as evening fell. A couple of hours later and I hadn't heard the monsoon outside, when BANG! All the lights went down and I thought I had gone deaf. The lightning had hit the ground less than 50m from the front door of the shop - which for once was closed. It sounded like a bomb going off. Ronin, with Pete Barton and Roz Allen on board won the first 11 races out of 12 at the 2009 nationals (they didn't sail the last race)

2008 and we're building moths. Specifically Velociraptor 'S' types of which there were only ever 2 - my boat (Voodoo - GBR 3372) and Adams boat (Envy - GBR 3373) for the 08 Worlds in Weymouth (Weymoth!). Both boats were in the shop in full on build mode, we were jigging in Adams foredeck and the glue was going off on the working deck join on mine. It was properly late - in fact we were on our way to working through to daylight, which when boats are being built isn't uncommon around here! The wind started to get up and I could hear the rain against the back window. We opened the front shutter door and turned out the workshop lights - It wasn't raining that hard and n fact there was a light fog, but the storm was above it. The sky flashed purple and then blue, then completely white - for so long at a time, you would have sworn it was 10am. 'Massive electric storm disrupts power supplies' was the headline in the next days 'Evening Star'. Adam got some pictures of his boat in build without a flash on his camera. Great boats... Rapid.. Adam won Kiel week about 2 weeks later.

A week ago and I'm finishing off the engineering in the foredeck of GBR52. Its late, but I'm nearly done. I heard a noise like next door are moving furniture, or maybe shutting their main doors. Not unusual I think to myself - except Mike from next door put his head around the corner to say he was going home maybe 6 hours ago. I open the main doors to get some air. Instantly there's a flash and a bang and I jump out of my skin. There's no rain - then I can hear it coming up the road - like a road cleaning truck but louder! The street lamps start to swirl in the torrent and simaltaniously... Flash - BANG - FLASH FLASH........................ Awesome awesome Spring storm. I turned off the computers (twice bitten!), made myself a coffee, and took 5 minutes to look out at the rain. I'm sitting on the tail of the skiff. Another one born in a storm.
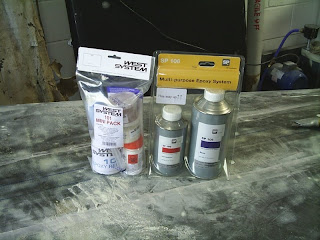
Monday 20 April 2009


So I'm a builder not a blogger - sorry about that skiff fans!! Loads done and loads left to do, making typing time short. Anyhoo, here's where we are up to. The foredeck is back down, the internals on the floor are now all cut and ready to go in and the rack tubes are about to get put in.
So that foredeck - well, we started out wanting to just check over all the structure and make it as good as the original, then we were advised to put in a piece of 50mm diameter tube for the sheets to go in (it was a while ago - hope you remember!)

Here's where we were up to then!~ Cut out the big gap in the foredeck, cut in a piece of carbon tube, make a new half frame to go where the new boats have a bulkhead, glue the whole lot back together with the central frame extending above the new tube then put the deck back down... er I can't get the .gif to show a series of pics so here's the time laps style photos in sequence..

Accurately mark out the cut lines (in black felt tip here) and using paper masking tape/marker pen, put on datum marks to replace the panel in the same place.
Cut out using a jigsaw with the blade at 30degrees to the vertical so that the panel can go back where you found it. Mark and cut out the central spine so that the tube insert lies in the right place.

Trial fit the tube and make sure it's a good fit at both ends, in the middle where the spine touches it etc etc. Don't ditch the spine material cut away - cut the width of the tube from it and then use the section left to fit back on the top of the tube to fit the deck to...

With everything made it's time to get gluing it all in position. White paper masking tape may appear weak but it has a nice bit of stretch which means the tension stays on when you tighten it. The additional half frame can be seen a couple of feet back from the stem.

With all the glue gone off and tidied up the structure is sound and the deck ready to go back on. A few additional items were sorted at this point as we hopefully won't be lifting the deck again any time soon. Couple of areas of delamination were sorted (i'll do a blog entry for that some time), an existing bulkhead needed re-gluing as the original line had failed and we added drain holes for the front section.
Finally sticking down the original panel - note how the lateral tape marks are used to line it all up and make sure the section goes back in the right place. We held the panel down with weights (tins of paint mainly). Final job will be a glass tape over the join to make totally sure it's air tight, then a skim of filler before we start painting - which isn't very far away now!!
What did we use - Well the only materials used to stick the whole thing together were SP106 resin and West's Mini Pack - both of which are not only great laminating resins and good at filling in the voids caused by delamination, but when mixed with microfibres and microballoons to make a filleting mix make fantasic general adhesive which is likely as not going to outlast the rest of the work. If you want to try them for yourselves, here's where to find out more about them! West Mini Pack and SP 106...