So I'm a builder not a blogger - sorry about that skiff fans!! Loads done and loads left to do, making typing time short. Anyhoo, here's where we are up to. The foredeck is back down, the internals on the floor are now all cut and ready to go in and the rack tubes are about to get put in.
So that foredeck - well, we started out wanting to just check over all the structure and make it as good as the original, then we were advised to put in a piece of 50mm diameter tube for the sheets to go in (it was a while ago - hope you remember!)
Here's where we were up to then!~ Cut out the big gap in the foredeck, cut in a piece of carbon tube, make a new half frame to go where the new boats have a bulkhead, glue the whole lot back together with the central frame extending above the new tube then put the deck back down... er I can't get the .gif to show a series of pics so here's the time laps style photos in sequence..
 Accurately mark out the cut lines (in black felt tip here) and using paper masking tape/marker pen, put on datum marks to replace the panel in the same place.
 Cut out using a jigsaw with the blade at 30degrees to the vertical so that the panel can go back where you found it. Mark and cut out the central spine so that the tube insert lies in the right place.
 Trial fit the tube and make sure it's a good fit at both ends, in the middle where the spine touches it etc etc. Don't ditch the spine material cut away - cut the width of the tube from it and then use the section left to fit back on the top of the tube to fit the deck to...
 With everything made it's time to get gluing it all in position. White paper masking tape may appear weak but it has a nice bit of stretch which means the tension stays on when you tighten it. The additional half frame can be seen a couple of feet back from the stem.
 With all the glue gone off and tidied up the structure is sound and the deck ready to go back on. A few additional items were sorted at this point as we hopefully won't be lifting the deck again any time soon. Couple of areas of delamination were sorted (i'll do a blog entry for that some time), an existing bulkhead needed re-gluing as the original line had failed and we added drain holes for the front section.
 Finally sticking down the original panel - note how the lateral tape marks are used to line it all up and make sure the section goes back in the right place. We held the panel down with weights (tins of paint mainly). Final job will be a glass tape over the join to make totally sure it's air tight, then a skim of filler before we start painting - which isn't very far away now!!
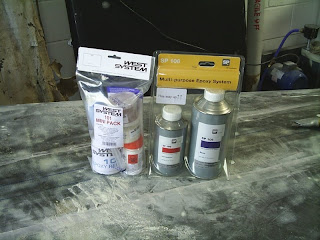
What did we use - Well the only materials used to stick the whole thing together were SP106 resin and West's Mini Pack - both of which are not only great laminating resins and good at filling in the voids caused by delamination, but when mixed with microfibres and microballoons to make a filleting mix make fantasic general adhesive which is likely as not going to outlast the rest of the work. If you want to try them for yourselves, here's where to find out more about them! West Mini Pack and SP 106...
No comments:
Post a Comment